
No products
Categories
- Bulk Deals!
- GTi Products
- Abrasives
- By Brand (Sanding Discs)
- 3M
- 3M Blue Net Discs
- 3M 150mm Purple Hookit Discs
- 3M 150mm Red Hookit Discs
- 3M 150mm Blue Hookit Discs
- 3M 150mm Green Hookit Discs
- 3M 150mm Gold Hookit Discs
- 3M 150mm Film Discs
- 3M Trizact Discs
- 3M 150mm Cubitron II Discs
- 3M 203mm Green Hookit Discs
- 3M Foam Discs
- 3M Soft Hand Abrasive
- Other 150mm Sanding Discs
- Mirka
- Indasa
- Sia
- Norton
- 3M
- Sanding Discs
- 3M Blue Net Discs
- 3M 150mm Green Hookit Discs
- 3M 150mm Red Hookit Discs
- 3M 150mm Gold Hookit Discs
- 3M 150mm Purple Hookit Discs
- 3M 150mm Blue Discs
- 3M 150mm Film Discs
- 3M Trizact Discs
- 3M 150mm Cubitron II Discs
- 3M 203mm Green Hookit Discs
- 3M Foam Discs
- Mirka 150mmm Galaxy Discs
- Mirka 150mm Q Silver Discs
- Mirka 150mm Sandy Discs
- Mirka 150mm Gold Discs
- Mirka 150mm Autonet Discs
- Mirka 150mm Polarstar Discs
- Mirka 150mm Abralon Discs
- Mirka 150mm Coarse Cut
- Indasa 150mm Plusline Discs
- Mirka 150mm Basecut Discs
- Indasa 150mm Whiteline Discs
- Indasa 150mm Ultravent Discs
- Other 150mm Sanding Discs
- Sanding Sheets & Strips
- By Brand
- 3M Blue Net Strips
- 3M WetorDry Sheets
- 3M Cubitron II Strips
- 3M Frecut Sheets
- Other 3M Strips
- Mirka Abranet Strips
- Mirka Abranet Small Packs of Strips
- Mirka Coarse Cut Strips
- Indasa Plusline Strips
- Indasa Mesh Line
- 3M Flexible Sheets
- 3M Abrasive Sheets
- 3M Paint Defect Abrasives
- 3M Production Paper Rolls
- Sia Strips
- Sanding Belts
- Abrasive Pads & Rolls
- Fibre Discs
- Roloc, Bristle & Surface Conditioning Discs
- Smaller Size Discs and Strips eg 50mm often used in Smart Repair
- Other Abrasives
- Ancillaries
- By Brand (Sanding Discs)
- Adhesives & Sealers
- Body Fillers
- Masking Materials
- By Brand
- Masking Sheeting
- Masking Tapes
- 3M Taped Masking Film
- 3M Trim Masking Tape
- 3M Fine Line 471+
- 3M Fine Line Tape 218
- 3M Precision Masking Tapes
- 3M 3434 Blue Masking Tape
- 3M Premium Masking Tape
- 3M 2328 Masking Tape
- Indasa Masking Tape
- GTi Masking Tape
- 3M Soft Edge Masking
- JTape Masking Tape
- JTape Fine Line Tape
- Q1 Premium Masking Tape
- Q1 High Performance Masking Tape
- Specialist Masking
- Other Masking Materials
- SPRAYGUNS
- Aerosols
- Ready Mixed Paint
- Paint Companies
- RAPTOR
- Paint & Preparation
- Personal Protection (PPE)
- Protective Vehicle Coatings
- Valeting
- Consumables
- General Maintenance
- Caravan & Motorhome
- Boating, Chandlery & Marine Products
- Tools
- Garage Equipment
- Clearance


How to Restore Your Headlights using the 3M Headlight Restoration Kit
Difficulty: Moderate
Yellowing headlights can ruin the appearance of your car and negatively affect the light output at night but with this tutorial we can get your headlights as good as new (if not better)! However, you must act quickly as yellowing can eventually put little cracks deep into your headlight, meaning you’ll have to buy a whole new, expensive headlight. It is possible to do this by hand (click here for that tutorial), but it is a long and laborious process. The 3M Headlight Restoration Kit is cheaper, quicker and more efficient than by hand.
Step 1: Preparing Your Headlights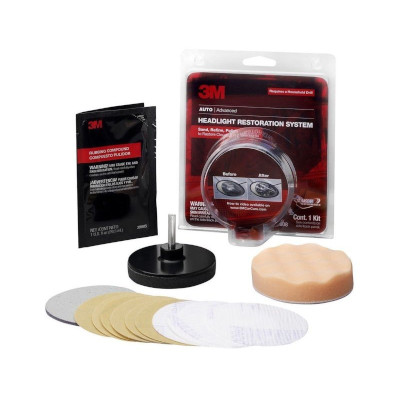
Wash the lens of your headlight with soap, water and a sponge. After the headlight is washed thoroughly, dry it off using a drying cloth and tape off the surrounding areas with masking tape to protect the paintwork.
Mound the disc pad holder onto your drill and attach the gold P500 grit abrasive disc. Using this, sand back and forth over your headlight with medium pressure until the yellow haze (and any other surface defects) are removed. This should leave a white, evenly sanded surface, giving a slightly frosted effect. If the lens is glossy or clear, repeat the sanding process.
Step 2: Sanding the Scratches
Attach the white P800 grit disc to the disc pad holder and sand the headlight as before. And wipe the lens with a microfibre cloth to check for any scratches. This step will make these scratches finer than before.
Replace the P800 grit disc with the P3000 Trizact Foam Disc. Use a spray bottle to wet the headlight with water and sand once more, constantly keeping it damp. Typically, this will create a white residue, if it does, sand over the lens 4-6 more times. However, if you don’t see the residue, sand over the headlight 10-12 times.
Wipe the lens with the microfibre cloth to check for any more scratches, and if you see any coarse ones, repeat the P3000 sanding process.
Step 3: Polishing Your Headlights
Attach the orange foam compounding pad to the disc pad holder and squeeze out a small amount of the rubbing compound onto it. Without turning on the drill, rub the foam pad over the lens.
Finally, polish the headlight with the drill on until the lens becomes clear and the cloudy haze is removed.
If you want more shine, you can add more of the rubbing compound to the headlight.
Your headlight should now be clearer, shinier and with a better light output!
Products Used In This Tutorial
3M Headlight Restoration Kit
Sponge
Drying Cloth
Meguiars Water Magnet Microfibre Drying Towel
Making Tape
Scotch 24mm x 50m Blue High Performance Masking Tape 3434, 36 rolls